Monday, October 24, 2011

ESXi - Storage

One of the very important section of ESXi is to understand Storage. Though big companies have Storage Administrators to take care of Storage but a VMware administrator has lot to understand and take care of this section.

Depending on type of storage used, datastores can have these two file systems; VMFS & NFS. The datastores are logical containers like file systems that hide specifices of each storage device and provide a uniform model for storing virtual machine files. Datastores can also be used for storing ISO images, VM templates etc. Several storage technologies are supported by VMware ESX/ESXi hosts in the VMware vSphere environment. These are locally attached storage, /fibre Channel, iSCSI and NAS (Network attached Storage). Let us understand Datastores, VMFS, NFS in more details before proceeding further.

DATASTORES

A Datastore is a logical storage unit that can use disk space on one physical device or one disk partition or can span across several physical devices. A VM is stored as a set of files in its own directory in the datastore. The datastore can be a VMFS or NFS datastore. The datastores can be used to store ISO images, floppy images, virtual machines and templates. A VMFS datastore can also hold Raw Device Mapping (RDM) which is used by a VM to access its data.

RDM (Raw Device Mapping) : The VMs running on ESX/ESXi host, instead of storing VM data in virtual disk file, you can store the data directly on a raw LUN. Storing the data this way is useful if you are running applications in your VMs that must know the physical characteristics of the storage device. Mapping a raw LUN allows you to use existing SAN commands to manage storage for the disk. The RDM is used to map to the raw LUN. RDM is a special file in a VMFS datastore that acts as a proxy for a raw LUN. It maps a file in a VMFS data store to a raw volume. A VM then references the RDM, which in turn points to the raw volume holding the VM's data. The raw device mapping is recommended when a its is must that VM should interact with a real disk on the SAN. e.g. when you make disk array snapshots or when you have a large amount of data that you do not want to move onto a virtual disk. When there is requirement to use VM in cluster using MSCS then Raw Device Mapping is very important.


Virtual Machine File System (VMFS) : The datastore reconised by VMFS which is created by assigning unpartitioned disks space. Once it is assigned an ESXi host automatically discover VMFS volume. This datastore is a clustered file system that allows multiple physical servers to read/write to the same storage device simulataneously. The cluster of file system enables unique virtualization-based services, which include:


Live migration of running VMs across physical servers.


Automatic restart of a failed VM on another physical server.


Clustering of VM across different physical servers.


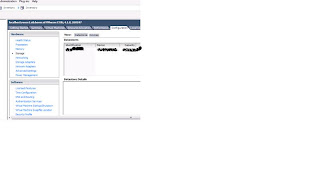
The VMFS allows IT organisations to greatly simply virtual machines provisioning by efficiently storing the entire machine state in a central location. VMFS sllows multiple ESX/ESXi hosts to concurrently access shared virtual machine storage. The size of a VMFS datastore can be increased dynamically while VMs residing on it are powered on. A VMFS datastore efficiently stores both large and small files belonging to a VM. A VMFS datastore can be configured to use an 8mb block size, to support large, virtual disk files up to 2 TB in size. A VMFS datastore uses sub-block addressing to make efficient use of storage for small files. VMFS provides block-level, distributed locking to ensure that the same virtual machine is not powered on by multiple servers at the same time. If a physical server fails, the on-disk lock for each virtual machine can be released so that virtual machines can be restarted on other physical servers. The VMFS can be deployed as locally attached storage, FCS SAN, iSCSI storage and these appear to VM as mounted SCSI device. The virtual disk hides the physical storage layer from the virtual machine's OS. For the OS on a VM, VMFS preserves the internal file system semantics. The semantics ensure correct application behavior and data integrity for applications running in VMs. To view existing ESXi VMware datastore, login in to host using VMware vSphere client, Click on configuration >> Storage. Click on any datastore whose detail is needed. It will show; Volume label (datastore..), Device, Capacity, Free, file system etc. To add another datastore, Click add storage from here, leave default option Disk/LUN select >> Click next which will bring to screen where you can un-assigned LUNs. Selected required storage and click next >> review layout and click next >> Give a suitable name to it click next >> here is the section where you can choose appropriate block size. The Virtual disk upto 256gb will require block size 1 mb, 512gb - 2mb, 1 TB - 4 mb, 2 TB - 8 mb. >> Click finish. To understand Block size in respect of disk size in more details please refer http://www.vmware.com/pdf/vi3_301_201_config_max.pdf . Though this pdf talks about host 3.1 and before but good to take a look.


LOCAL AND SHARED STORAGE


All VMware ESX and ESXi installables are installed at Local storage. Also it is ideal for small environments. When all VMs are located on local sotrage management become easier. The usage of shared storage is


>vMotion.


>fast central repository for virtual machine templates


>recovery of VMs on another host incase of a host failure.


>Clustering of VM across hosts.


>Allocate large amounts of storage.


IP Storage


The ESX & ESXi hosts support two types of IP storage; iSCSI and NAS. iSCSI is used to hold one or more VMFS datastores whereas NAS is user to hold one or more NFS datastores. Both are used to hold virutal machines, ISO images and templates. vMotion, HA, DRS etc. features are supported on these datastores. The ESX & ESXi hosts support upto 64 NFS datastores and iSCSI and NAS run over 10 Gbps which provides increased storage performance.


iSCSI Components


Let us take a scenario where an iSCSI SAN storage system has more than one LUNs and 2 Storage processors. The communication between host and storage happen over a TCP/IP network. The components for this scenario will be as below:


1. iSCSI Storage consists of, number of physical disks under number of LUNs and storage processors connecting to TCP/IP network.


2. TCP/IP Network


3. Physical servers with software or hardware iSCSI initiators (HBA) connecting to TCP/IP network.


An iSCSI initiator trasmits SCSI commands over the IP network. A target receives SCSI commands from the IP network. You can have multiple initiators and targets in your iSCSI network. iSCSI is SAN oriented because the initator finds one or more targets, a target presents LUNs to the initiator and the initiator sends it SCSI commands. An initiator resides in the ESX/ESXI host. LUN masking is also available in iSCSI and works as it does in Fibre Channel. Ethernet switches do not implement zoning like Fibre Channel switches. Instead you can use VLANs to create zones.


Let us discuss iSCSI initiators; Software & hardware. The Software iSCSI initiator is VMware code built in to the vKernal. It allows host to connect to the iSCSI storage device through standard network adapters. The software iSCSI initiator handles iSCSI processing while communicating with the network adapter. With the software iSCSI initiator you can use iSCSI technology without purchasing specialised hardware.


Hardware iSCSI - A hardware iSCSI initiator is a specialised thierd-party adapter capable of accessing iSCSI storage over TCP/IP. Hardware iSCSI initiators are divided further into two categories: dependent and independent hardware. A dependent hardware iSCSI initiator or adapter depends on VMware networking and on iSCSI configuration and management iterfaces provided by VMware. This type of adapter, such as a broadcom 5709 NIC presents a standard network adaptor and iSCSI off-load functionality for the same port. To make this type of adapter functional, one must setup networking for the iSCSI traffic and bind the adapter and an appropriate vKernel iSCSI port.


An independent hardware iSCSI adapter handles all iSCSI and network processing and management for the host. The QLogic 4062C is an example of an independent hardware iSCSI.

Thursday, September 15, 2011

Install and Configure VM ware ESXi 4.1 host

As it was stated in previous post that ESXi 4.1 software has a footprint as small as 70 mb, just like firmware insalled on the system. It comes as embedded in a server's physical hardware by vendor or burnt onto an external USB key. But remember that moving ESXi embedded on USB external key from one server to another is not supported. The ESXi software also comes as an installable CD/DVD.

Let's now proceed with the installation. We are considering Dell server which meets all pre-rquisits, hardware requirements etc. and we are installing from a DVD. To know more about hardware requirements please visit below link: http://kb.vmware.com/kb/1022101

Installation

Turn on the server, insert the DVD and boot from disk. Once installation is initiated, it will take few minutes to complete without any further keyboard inputs and you will be presented with following screen after installation is complete.


Configuration

Next step is to configure your ESXi 4.1 host. Press F2 to go to configuration screen. You will be prompted for user name password. By default admin user is 'root' and password is blank. Once you login you will reach to configuration console know as (DCUI) Direct Console User Interface. The DCUI looks as below:


First thing is to configure root password. It is important to configure root password to be able to login to vSphere client.


-Configure Host Name
-Configure IP Address, Subnet mask, Gateway
-Configure DNS servers.

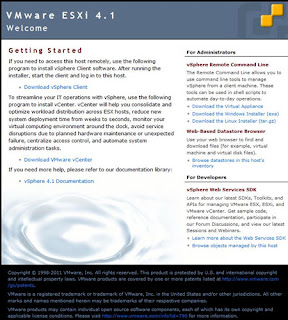
Once above configuration is done, press F2 to exit the DCUI and F12 to reboot your host. Make sure you add a host record to your DNS server for this ESXi host. Now you are ready to create virtual machines on your ESXi 4.1 host. Open browser on any machine in the same subnet in which you have your host. Type the host name or IP address of your ESXi 4.1 host and you will be presented with below screen:


Click Download vSphere Client, once download completes continue with the istallation. Once installation is complete launch vSphere client from Start > All programmes >> enter the IP address or Host Name of your ESXi 4.1 host >> user name - root and password.


You are now in virtualisation world, explore all settings and my next post will be about creating virtual machines.

Monday, September 5, 2011

What is Virtualisation

The ability to run multiple machines with separate Operating system and Application on a single machine is Virtualisation. In other words the technology with which we can transform hardware into software is Virtualisation. Virtualisation uses either Hosted Architecture or Bare-Metal hypervisor Architecture.

HOST BASED VIRTUALISATION
It requires an Operating System to be installed on a computer. For example a computer which is running Windows 7/xp or any linux Operating system, VMWare server or workstation Virtualisation layer is installed on it. This is called host based Virtualisation. Once VM ware server/workstations version is installed, virtual machines can be created and deployed. This virutal machines will have their own Operating Systems and set of Applications. Though this is good solution in testing environment and production environment to certain extent but this might not be an idle solution for production environment. There are few drawbackups e.g. rebooting hosting OS means all virtual machines will be rebooted too and many more.

VIRTUALISATION USING A BARE-METAL HYPERVISOR
A Bare-metal hypervisor system does not require an operating system. The Hypervisor itself is an Operating System. It installs the virutalisation layer directly on a clean x86-based system. Because a bare-metal hypervisor architecture has direct access to the hardware resources, rather than going through the Operating System which make it more efficient than hosted architecture. This delivers greater scalability, robustness and performance. A hypervisor is the primary component of virtualisation that enables basic computer system partitioning i.e. simple partitioning of CPU, memory and I/O. VMware ESX/ESXi employs a bare-metal hypervisor architecture on certified hardware for datacenter-class performance.

WHAT IS A VIRTUAL MACHINE
From a user's perspective, a virtual machine is a software platform that like a physical computer runs an operating system and applications.
From Hypervisor's perspective, a virtual machine is a discrete set of files. The main files are as below;

- Configuration file
-Virtual disk file
- NVRAM settings file
-Log file

WHY VIRTUALISATION
Virtual machines have many advantages over physical machines.
Virtual machines are easy to move and copy across different hosts.

Encapsulated into files.

Independent of Physical hardware.

Isolated from othr virtual machines.

Insulated from hardware changes.

Provides the ability to support legacy applications.

Allows server to be consolidated.

Saturday, July 30, 2011

VMWare Basic things to start with

Those who already know basics about VM Ware or already working on this technology can skip reading this article. But if you are aspirant to learn this technology and want to make your careers then here are few basic things.


It is very important that one should be comfortable with networking, subnetting type of storage and should have worked System Engineer on windows, Linux platforms. Though these are not the madatory requirements but these will make learning easier. If you are comfortable with above mentioned things then it will be very much helpful to do your homework before enrolling for classroom training. Because VMWare Certification is not possible without minimum 5 days of classroom training from an authorised VMWare training partner. As 5 days classroom training is approx. 45000/- (US $ 1000), so home work before going for classroom training become very important. The first thing you can do is join VM Ware community http://communities.vmware.com/. The community will let you know what experts are talking about. The next thing you can do is little hands on. The trial software can be downloaded from VM Ware website. http://www.vmware.com/support. You will find Various products listed on VM Ware's official website but the one we will be discussing about is Esxi 4.x, the one which will be used in data center. All relevant documents can be found on VM ware website.


VMWare vSpher Introduction


VMWare vSphere leverages the power of virtualisation to transform datacenters into simplified cloud computing infrastructures and enables IT organisations to deliver flexible and reliable IT services. VMWare vSphere virtualises and aggregates the underlying physical hardware resources across multiple systems and provides pools of virtual resources to the datacenter. As a cloud oprating system. VMWare vSphere manages large collections of infrastructure, such as CPUs, Storage and networking, as a seamless and dynamic oprating environment and also manages the complexity of a datacenter. The following component layers make up VMWare vSphere


---->>Infrastructure Services,


---->>Application Services,


---->>VMware vCenter Server


---->>Clients


The very important thing about VMWare esxi 4.x is that this is plateform independent which means it is directly installed on baremetal. The previously VMware had ESX which came with service console but with lauch of esxi 4.x VMware had obselete the ESX which means no more service console. The ESXi 4.1 foot print is as small as 32 mb. You initiate the installation and no keyboard input required. The hardware vendors like Dell (I will talk about Dell because am skilled on Dell PE servers) has esxi 4.1 embedded. You create vritual machines running Services like DC, AD. Exchange servers, file/print servers, db server on top of this 32 mb footprint.


Wednesday, July 20, 2011

Creating of VMs on ESXi Host

To start with process of creating first virtual machine, launch VM ware vSphere Client. Log-in with the credentials which were set while configuration. One you are successfully logged in, you will see your ESXi host name on the left pan. On the right pan click on Configuration tab and go through all sub tab which is very important to understand. Another important thing to do upon first login is to add license to your host.

Once you have gone through all settings, click on getting started tab and click on 'Create a New Virtual Machine'. Wizard will launch where you can choose require CPUs, RAM, Storage and all other hardware requirement for the VM by following wizard. As there will be requirement to create several VMs on your ESXi host, so naming convention should be pre-decided to name all VMs on your host. Please remember Virtual Machines are very important component of Virtual Infrastructure so choose correct resources as per requirement of that VM. All virtual devices attached to a VM will function like physical hardware on a machine. Once 'Create a new Virtual Machine' wizard complete you will see complete page. It is recommend to review configuration at this point. If you need to see stepe by step configuration/selection of CPU/RAM/DATA store/Networking etc. then please refere 'vSphere Virtual Machine Administration Guide ESXi 4.1'. Though we have completed the VM creation part but it is still incomplete until we install an Operating System. You know, what operating system you had selected during the VM creation wizards (e.g. windows server 2008), so please insert respective disk or make sure ISO is present in datastore and start your VM. The OS installation process is as simple as installing it on physical machine. If some one want detailed explaination about this then please refer http://partnerweb.vmware.com/GOSIG/home.html and select appropriate OS. Once installation is complete, please do install vm ware tools. If you are installing your OS from ISO image then please make slight changes on your VM configuration as below but rest of the proces is as installing from a CD/DVD:


a) Right-click the virtual machine in the inventory list and select Edit Settings.
b) Click the Hardware tab and select CD/DVD Drive.
c) In the Device Type panel, select Datastore ISO File and browse for the ISO image for your guest operating system.


A virtual machine consists of several types of files that you store on a supported storage device. The key files that make up a virtual machine are the configuration file, virtual disk file, NVRAM setting file, and the log file. You configure virtual machine settings through the vSphere Client and should not need to touch these files. Below is overview of these important files of a Virtual machine:


File , Usage , Description

.vmx , vmname.vmx , Virtual machine configuration file
.vmxf , vmname.vmxf , Additional virtual machine configuration files
.vmdk , vmname.vmdk , Virtual disk characteristics
-flat.vmdk, vmname-flat.vmdk, Preallocated virtual disk
.nvram , vmname.nvram or nvram, Virtual machine BIOS

.vmsd , vmname.vmsd , Virtual machine snapshots
.vmsn, vmname.vmsn , Virtual machine snapshot data file
.vswp , vmname.vswp Virtual machine swap file
.vmss , vmname.vmss , Virtual machine suspend file
.log, vmware.log , Current virtual machine log file
-#.log , vmware-#.log , Old virtual machine log entries
(where # is a number starting with 1)

Cloning and creating Templates


So far we have discuss how to create one VM but in some time we might have to create 100 VMs. So creating that number of VMs manually is tidious and boring task. This is time when Cloning or creating Template comes into picture. Cloning and template serves common purpose to certain extent but these are entirely different things. Clining is a copy of existing VMs with all installed softwares, OS etc. but we have option to edit few things while Cloning which are computer name , networking settings etc. Cloning a virtual machine can save time if you are deploying many similar virtual machines. You can create,configure, and install software on a single virtual machine, and then clone it multiple times, rather than creating
and configuring each virtual machine individually.


If you create a virtual machine that you want to clone frequently, make that virtual machine a template. A template is a master copy of a virtual machine that can be used to create and provision virtual machines. Templates cannot be powered on or edited, and are more difficult to alter than ordinary virtual machine. A template offers a more secure way of preserving a virtual machine configuration that you want to deploy many times.


CLONING OR CREATING TEMPLATES ARE DONE WHEN CONNECTED TO vCENTER. IT IS NOT POSSIBLE WHILE CONNECTING DIRECTLY TO ESXi HOST


The resultant machines which are copied by clone or template are independent from original. Any changes done on original are not refletected on its copies. The pocedure to clone a machine as below:


Steps to Clone a machine


Connect to vCenter and Right click the VM to be cloned >> click clone >> Enter Vm name and follow all the steps as per wizard>>> at the end you can click finish and power on this VM or select Edit this VM as necessary. We can schedule to clone a machine but from vCenter.


Steps to Create a Template


To create a Template your ESXi host should be managed from vCenter. Template can't be created by connecting to ESXi host directly. Create a VM and turn it off. Right Click >> Convert to template and vCenter will convert that machine to template. You can't edit or power on this template until it is converted back to a VM.


Cloning a Virtual Machine to a Template


This process will create a copy of the virtual machine while leaving the original virtual machine in place. Here is the procedure:


1 Right-click the virtual machine and select Template > Clone to Template.
2 Give the new template a name, select its inventory location, and click Next.
3 Pass through the target location page and click Next.
4 Specify in which format to store the template’s virtual disks (same format/thin/thick provisioning) and click Next.
5 Click Finish. vCenter Server displays the Tasks inventory panel for reference and adds the cloned template to the list in the information panel.


Clone a Template


Connect to vCenter server and right click the Template >> select clone. Give this cloned template a unique name >> choose cluster or host this to reside on >> select data store >> choose disk formate (same/thin/thick) >> review and/or finish.


How to Delpoy Virtual Machine from Template


Make sure you are connected to vCenter server >> right click the template >> Deploy Virtaul machine from this template >> Select Host or Cluster to run this machine on (stand alone host/on a cluster with DRS/on a Cluster without DRS) >> Resource pool >> Data store (same or different locations) >> disk format (same/thin/thick)>>Guest OS >> finish to turn on this VM or edit.


There are few other things while playing around with Cloning, Templates etc. are Deleting Templates from vCenter inventory which means a template is deleted from inventory but still remain on the disk which can be re-registered, Deleting Templates from Disk means it is deleted permanently, Re-registering Templates is for the templates which were deleted from vCenter inventory.